It’s been a little while since my last Ambisonics on YouTube post, so I thought I’d share a filter I’ve made to help make YouTube Ambisonics content sound better! As you may have noticed, the audio that comes off YouTube once your spatial, Ambisonic, audio is uploaded is quite coloured compared to the original. This is due to the Head Related Transfer Functions used in the modelling of the system. If the HRTFs exactly model your own hearing system, then we wouldn’t notice it, but as they won’t, you will!
In order to equalise the system, the same EQ curve just needs applying to all the Ambisonic channels equally before uploading to YouTube. So, first, we need to find the average response of the system. There could be a few methods for this, but the simple approach is to pan an impulse around the listener, storing the frequency response each time. Sum these together, and average them in some way (I used an RMS type approach). This is then an ‘average’ response of the system. I then invert this system (adding delay as it’s non-minimum phase) and then decompose the filter into it’s minimum phase only response for the EQ (as that’s all we’re really interested in).
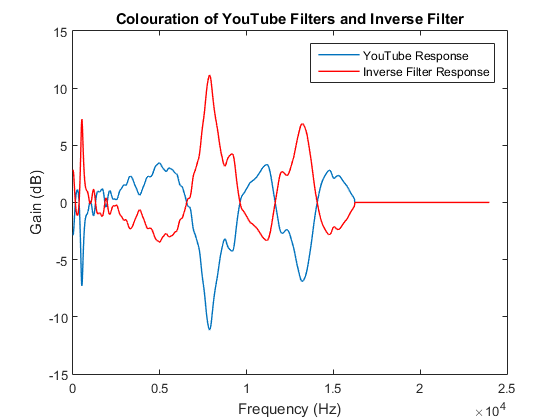
To use this in your Reaper project, load the filter into ReaVerb (as an impulse file) and apply it to all four channels of your ambiX B-format before adding it to your video and uploading to YouTube. As long as you do the same thing to each of the four B-format channels, it won’t affect the spatial aspects of the recording, just the frequency response. A plot below shows the frequency response of YouTube and the generated inverse filter. Note that I’ve used my measured YouTube filters for this, so there was no data above 16kHz. To make this not make the inversion go a little crazy, I’ve assumed it’s flat after this point (YouTube filters out after this point anyway!)
You can download the filter, if you’d like to try it, below.
Inverse Filter for YouTube 1st Order Spatial Audio
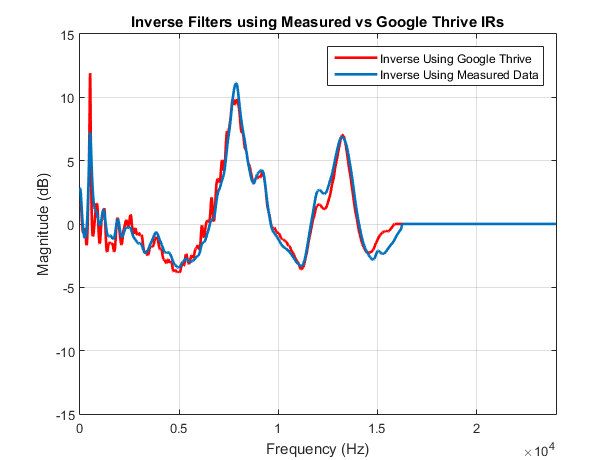
EDIT : Below is an inverse filter I’ve calculated from the Google Thrive Impulse Responses, rather than my measured IRs. It’s very similar, frequency response wise, but should be a slightly better match with the algorithm YouTube is using. The previous also had my DAC and ADC in the chain!
Inverse Filter for YouTube Spatial Audio Created Directly from Google Thrive IRs
The differences between the two inverse filters can be seen below (again, I’m leveling off the response to account for YouTube rolling off after around 16kHz).
For completeness, below are the inverse filters calculated right up to around 21.8kHz (where the anti-aliasing filters kick in in the Google Thrive data). I can’t tell any difference, but I also can’t hear much above 16kHz, so I wouldn’t, would I!)
Inverse Filter for YouTube’s Spatial Audio using Google Thrive IRs up to 21.8kHz
Below is a graph of how the higher frequencies are boosted compared to the others:

A demo of it working is below:
Hello Bruce
Thank you for this great filter. Really handy thing to have. I read on Spatial Audio FB group that to use it I’d have to split the signal to 4 separate tracks and insert the reverb on each one. Just to make sure: I’d have to have Dry -inf and Wet 0dB, wouldn’t I?
Thanks a lot!
Yep, that’s correct.
Cheers
Bruce
Hi Bruce,
Is this still the case or have YouTube updated this?
Thanks
Google have updated their filters recently. I’ll be updating these filters soon….